- Nov 9, 2024
Fabulous Custom Christmas Ornaments in No Time!
- Brenda Lambert
- 0 comments
Mastering Print and Cut for Stunning Silhouette Ornaments
As the holiday season approaches, the urge to create festive, personalized decor becomes irresistible. This year, why not take your Christmas ornament game to the next level with custom designs made right at home? In this comprehensive guide, we'll dive into the secrets of print and cut with the Silhouette Portrait 4, unlocking the potential to craft stunning, one-of-a-kind ornaments that will dazzle your friends and family.
Preparing Your Silhouette Studio for Print and Cut Success
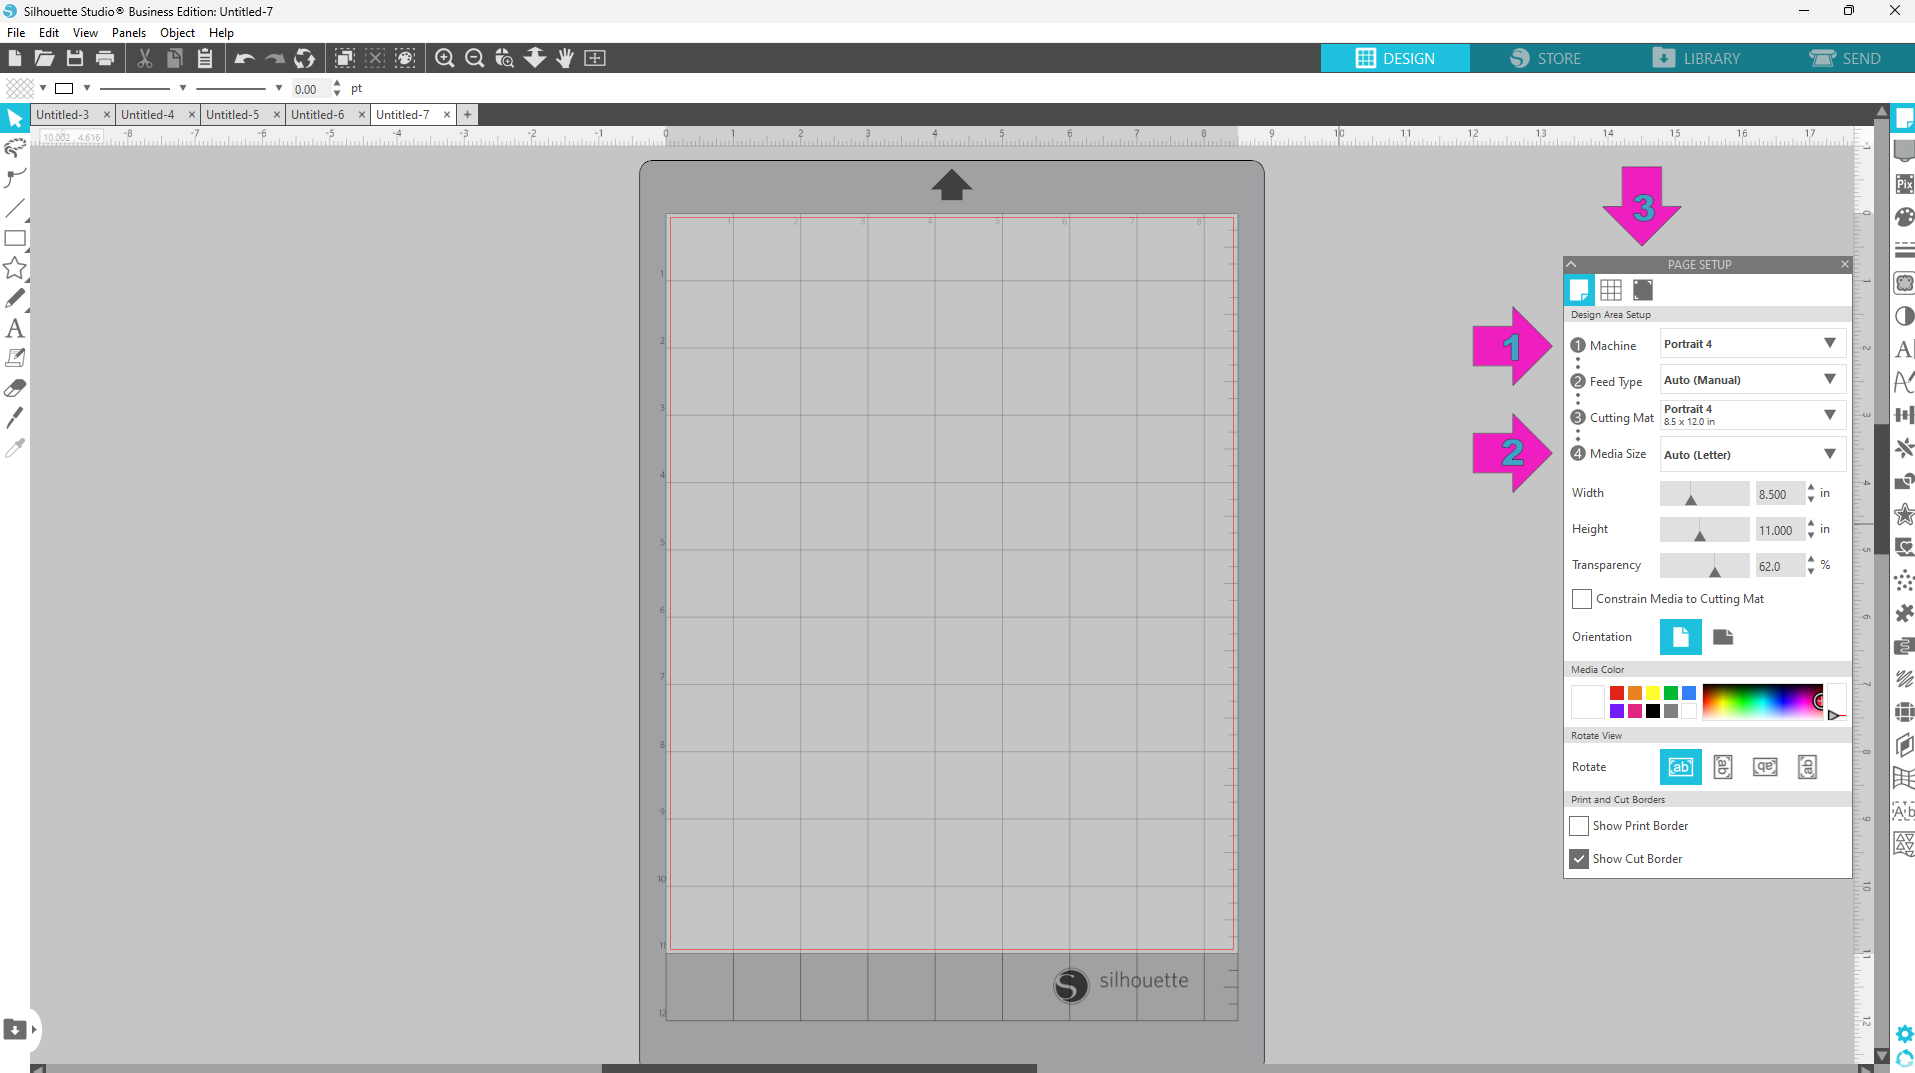
Before we get our hands dirty with the actual crafting, it's crucial to ensure your Silhouette Studio software is set up for seamless print and cut operations. Let's start by configuring the page settings:
- Select the Silhouette Portrait 4 as your cutting machine in the Page Setup panel.
- Set the Cutting Mat to the Portrait 4 size and the Media Size to Letter.
- Navigate to the third tab and turn on the Registration Marks. This will allow your machine to accurately read the cut lines.
Now that the page is ready, it's time to bring in your design files. Rather than the traditional "File & Merge" approach, there's a quicker way to get your images onto the mat:
- Open your File Explorer and locate the folder containing your design files.
- Switch the view to "Large Icons" to get a better visual of the available images.
- Simply click and drag the desired files directly onto the Silhouette Studio design mat. No more tedious merging!
With your files in place, the next step is to ensure they're all scaled to the perfect size. Fortunately, Silhouette Studio offers a handy tool to streamline this process:
- Click the "Select All" button to highlight all the images on your mat.
- Center the grouped designs and then double-click on the width value at the top of the screen.
- Enter the desired width, in this case, 7.85 cm, to resize all the images simultaneously.
If you ever need to switch between units of measurement, simply click the small gear icon at the bottom of the screen and select your preferred option from the dropdown menu.
Customizing Your Ornament Designs
Now that the basic setup is complete, it's time to start personalizing your ornament designs. Let's say you want to incorporate a cherished family photo into one of the ornaments. Here's how you can do it:
- Drag your photo file onto the design mat.
- Use the Image Effects panel to adjust the brightness, saturation, and contrast to your liking.
- Select a circular shape from the library and position it over the photo.
- With both the shape and photo selected, use the Modify panel to crop the image to the desired circular format.
For a truly unique touch, you can even create a double-sided ornament by duplicating the photo and printing it on both halves of the clear acrylic ornament. This way, the design will be visible from all angles.
If you're looking to add some extra sparkle to your ornaments, consider incorporating glitter. Simply apply a thin layer of Mod Podge to the back of the printed design, then generously sprinkle on your favorite glitter. Be sure to clean off any excess Mod Podge and glitter from the edges to ensure a seamless closure of the ornament halves.
To further enhance the ornaments, you can incorporate additional embellishments, such as the iridescent snow-like confetti or Jingle Bells, both of which can be found at your local dollar store. The possibilities for customization are endless, allowing you to create truly unique and personalized ornaments that reflect your style and the special memories you want to celebrate.
Perfecting the Print and Cut Process
With your designs ready, it's time to tackle the print and cut process. This is where the true magic happens, transforming your digital creations into tangible, custom ornaments. Let's walk through the steps:
- Ensure your printed designs are positioned at the top-left corner of the cutting mat, with the top-left grid line covered by the paper.
- Load the cutting mat into your Silhouette Portrait 4, aligning the edge of the mat with the line and arrow on the machine.
- Close the lid while the machine reads the registration marks for the most accurate cut. This is especially important when working with glossy paper or holographic materials, as external light can interfere with the sensor.
One of the key advantages of the Silhouette Portrait 4 is its exceptional print and cut accuracy, which you'll witness firsthand as the machine precisely cuts around your designs. To maintain a flat, curl-free finish, be sure to flip the cutting mat over and peel the mat away from the paper, rather than the other way around.
If you're new to working with cutting mats and machines, this step-by-step process may seem a bit daunting at first. But with a little practice, it will become second nature, and you'll be churning out professional-looking custom ornaments in no time.
Assembling Your Ornaments
The final step in creating your fabulous custom Christmas ornaments is the assembly. The ornaments featured in this tutorial come in two halves that snap together, allowing you to easily insert your printed and cut designs.
When putting the ornaments together, be mindful of the orientation – you'll want to position the printed design along the inner ridge so it's visible from the front. To ensure the image stays securely in place, a small dab of hot glue around the edge can be a game-changer.
For an extra touch of holiday sparkle, consider adding a ribbon or pipe cleaner around the seam of the ornament. This not only hides any imperfections but also adds a beautiful, festive accent. You can even take it a step further by incorporating additional embellishments, such as the Styrofoam "snowballs" or Jingle Bells, to truly make each ornament a one-of-a-kind masterpiece.
Sourcing Supplies for Your Custom Ornaments
Now that you've mastered the art of creating custom Christmas ornaments with your Silhouette Portrait 4, you're probably eager to get started on your own projects. To help you out, here are a few key supplies you'll need:
- Clear acrylic ornament blanks - You can find these on Amazon or at your local craft store.
- Silhouette design files - Check out creative marketplaces like Creative Fabrica for a wide selection of ornament designs.
- Mod Podge, glitter, and other embellishments - Don't forget to stock up on the essentials to add that extra touch of holiday sparkle!
And if you're interested in attending the All Things Silhouette Conference, where you'll have a chance to win a Silhouette Portrait 4 of your own, be sure to visit Terri Johnson's website to grab your ticket.

Unleash Your Creativity and Craft Unforgettable Ornaments
With the Silhouette Portrait 4 and the secrets of print and cut in your arsenal, the possibilities for creating custom, personalized Christmas ornaments are truly endless. Whether you choose to incorporate family photos, festive designs, or a touch of glitter and embellishments, each ornament you craft will be a unique reflection of your style and the special memories you want to celebrate this holiday season.
So, what are you waiting for? Dive into the world of custom ornament making and let your creativity shine. Now - go create something amazing!
This post contains affiliate links and I earn commissions from qualifying purchases. This will not cost you any extra.